
Facebook is an eminent social media platform worldwide. One study found that Facebook has about 2.60 billion monthly active users and 1.73 billion daily users. Moreover, it is a great reason to link your Facebook account to your website. It can help to engage more visitors without even directing them off your website.
Are you wondering about embedding your Facebook feed on your website? Here are the two simplest ways to embed a Facebook timeline on your WordPress website.
Let’s drive into it!
Why You Should Embed Facebook Feed On The Website?
Integrating Facebook feed on your website permits you to generate more leads and hike conversion directly on your website. In addition to this, embedding a Facebook feed adds social proof and hikes engagement to your website.
Moreover, it is beneficial for promoting upcoming events, new offers, and many more. It will also help to attract more users, establish brand relationships, and get a loyal customer base. Now, let’s begin with the two easiest ways to embed your Facebook feed to your WordPress website.
First Way: Use Facebook Page Plugin
The foremost way to embed your Facebook page to your WordPress website is by using Facebook Page Plugin. This plugin permits you to embed or promote any Facebook page on your website, so visitors like and share the page without leaving your website. Moreover, for embedding your Facebook feed on your website, follow the given below steps.

[Some built-in customization options to showcase your Facebook Page Feed]
Step 1:
Go to the Facebook Page Plugin.

Step 2:
Copy and Paste your desired Facebook Page URL.

Step 3:
After that, use Tabs (Timeline, Event, and Message).
Timeline Tab: It will display the most recent post of your Facebook Page Timeline.
Event Tab: In this, visitors can follow your events and subscribe to the event.
Message Tab: The individual can message your page directly to your website, but they have to log in to use this feature.
Importantly, you can also use all of them on a single page.

Step 4:
Now, it’s time to write the specific weight (minimum 180 to maximum 500) and height (minimum 70). With that, also select the given option in the checkbox according to your requirement.

Step 5:
Once you are completed the above steps, click on the Get Code button.

Step 6:
Copy and Paste the code into your blog post, slider, or any place on your website.

Apart from this, you can also change the language of the Page plugin by changing in “js. src” file. For instance, replace en_US in your native language like ru_RU (Russia).

This is the simplest way to embed your Facebook timeline on your website, but it has some limitations too. So, before moving to the next way, let’s take a look at that first ??.
Some Restriction While Manually Embedding Facebook Page Plugin:
- You want to customize your Facebook timeline with your brand identity, but with this Facebook Page plugin, you can not customize it. That is the reason it gets hard to change your timeline background color and icons.
- When you deal with code customization, there is a higher chance of making a mistake. Perhaps, you may break your website in this process.
- With this plugin, you can not showcase your Facebook group feed on your website. For that, you have to use another related plugin.
- You have to be very careful while placing the code to embed your Facebook feed on your website. Sometimes, it can be a little bit confusing to switch between different web pages.
The most disheartening moment in a foremost way is when you unwittingly break your website during manually embedding a timeline to your website. To resolve this hurdle, you need to hire a WordPress developer or spend time and resources to fix your website.
For the safer side, you can follow another way that is to embed your Facebook timeline automatically with the use of the WordPress plugin. Now, it’s time to look at the second way.
Second Way: Embed Your Facebook Timeline To Your Website Using Social Stream Designer Plugin
The second most effective and easy way to embed your Facebook timeline on your website is using the WordPress plugin. No doubt, there are a plethora of plugins available in the global market to choose from. Here we would like to recommend the most powerful Social Stream Designer WordPress plugin.

This plugin allows you to create a stunning responsive wall on your WordPress website or blog page in a few minutes. Apart from Facebook, it permits you to embed other social media feeds like Twitter, Instagram, Pinterest, RSS, and many more.
Furthermore, the plugin supports the six most popular layout styles, including Grid, Masonry, List, Horizontal Slider, Vertical Slider, and, Timeline to develop an attractive social media feed on your website. In addition to this, the plugin provides more than 40 customization options for unique styling and designing social media feeds on your website.
Reasons to Use Social Stream Designer WordPress Plugin on Your Website
There are various reasons to use the social stream designer plugin.
- Using this plugin, you can add an unlimited social stream with a different design on your WordPress website.
- The plugin supports Fancybox, which makes more eye-catchy social media feeds to showcase wonderful content in a fancy box.
- This plugin supports three types of pagination, such as Standard pagination, Load More, and Autoload.
- The plugin permits you to animate the social media feed content and easily manage the animation of the content and image.
- With this plugin, the visitor can easily search for the post or short content.
- The plugin is compatible with all well-known web browsers such as Chrome, Opera, Safari, Firefox, Internet Explorer, and many more.
- The plugin provides a live preview option so a user can preview every layout at the time of creation and modification.
- This plugin is translation ready and well documented with all types of configuration settings.
- The plugin has been developed with the latest technology. So, it is compatible with Bootstrap and FontAwesome.
- This plugin provides an easy to use Admin panel with unlimited options.
Useful Read: Importance of Social Media Integration [Discover The Benefits]
1. Install and Activate Social Stream Designer WordPress plugin
There are two ways to install this plugin on your website. The first is with the WordPress Admin Area. And, the second is using FTP (File Transfer Protocol).
Step 1:
Installing with WordPress Admin Area
(A) Login to your WordPress Admin Panel
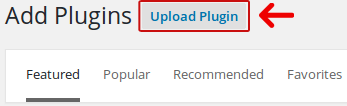
(B) Go to the Plugins on the left side menu and click on the “Add New” button.

(C) On the top of the page, you can see the “Upload Plugin” button, click on it.
(D) Download the Social Stream Designer plugin from the member area of the Solwin Infotech website. Now, upload the plugin zip file (social-stream-designer.zip) using the drag and drop or file uploader section. Then, click on the “Install Now” button.

After installing the plugin’s file, it’s time to activate by clicking on the Activate Plugin.

Step 2
Installation using FTP:
(A) Download the Social Stream Designer plugin from the member area of the Solwin Infotech website. And, you will get a social-stream-designer.zip file.
(B) After that, extract the zip file. It will create a “Social Stream Designer” folder with all the plugin files and folders inside it. Importantly, remember the extracted folder path.
(C) Now, using FTP programs like cPanel or Filezilla, upload the non-zipped plugin folder into a “/wp-content/plugins/” folder on your web server.
(D) Go to Dashboard » Plugins » Installed Plugins and search for Social Stream Designer from the plugin list.
Click on the “Activate” button to activate the Social Stream Designer plugin.
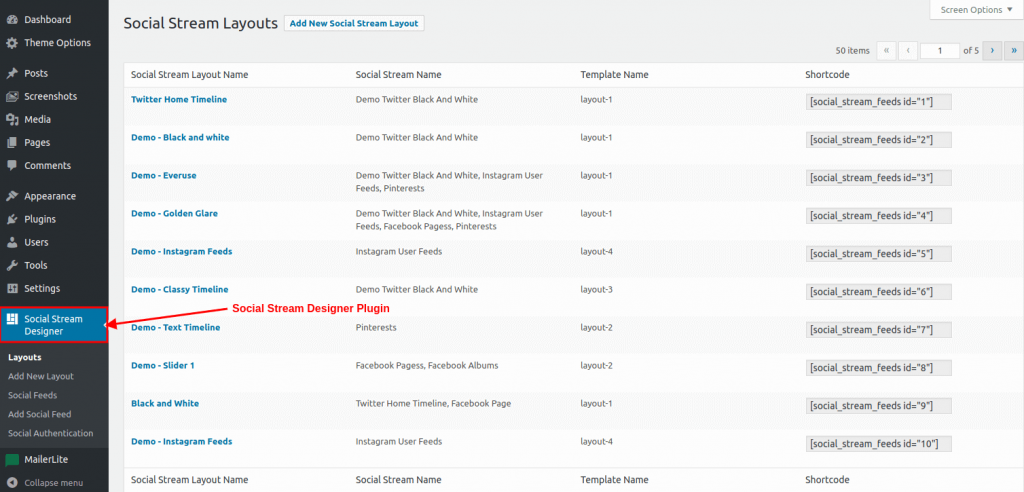
Now, you can see the Social Stream Plugin layout on your website Admin Panel.
2. General Settings (Add New Layout)
Now, it is time to add a new Facebook layout to your website. Fill in all the details as given in the screenshot according to your requirements. For instance, select the social stream as a Facebook from the drop-down menu.

1.1 Select the Card Layout
The plugin provides several card layout settings for embedding a Facebook timeline to your WordPress website. You can select the best fit on your website. Moreover, you can also arrange the position of the card layout using a drag and drop builder.

3. Share Icon Settings
For this plugin, you can also display the social media icons on your website. Select “Yes” to set the social icon setting as in the given screenshot. The plugin also provides you a social share icon type like Icon, Text, or both (Icon and Text).

Once you fill in all the details, press the “Save” button.
4. Add Social Media Feeds

With this plugin, you can easily set the new social media feed on your website. Just add a feed name, select the specific feed stream like Facebook, feed type, limit, and many more as in the above screenshot.
5. Facebook Social Authentication Settings

For authentication settings especially for Facebook, you just need to enter Facebook Page id, customer secret as well as access token key.
For more detailed guidance, visit the documentation part of this plugin.
Final Verdicts!
That’s the end! We hope this article helps you to embed Facebook feed into the website directly without any hurdle. It is useful to establish brand awareness.
We would also like to hear your experience, so share it in the comment section below. To get maximum benefits from social media, contact our Social Media Marketing team. No matter which business you are in, they help you to expand your reach.